
The Main Menu provides functions for operating the whole “OPTPiX SpriteStudio”. The Main Menu is comprised of two sections: the menu bar (menu part) and the toolbar.

[File]Menu
This is the menu to implement Read/Save of Project File and various settings and Exit of “OPTPiX SpriteStudio”.
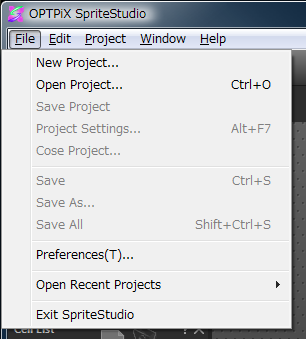
| New Project | It closes the editing project and creates new project. |
|---|---|
| Open Project | It reads in the existing project file. |
| Save Project |
It saves all the data of the currently-working project. |
| Project Settings |
It opens the window to change the settings of the currently-working project. |
| Close Project | It closes the currently-working project. |
| Save | It overwrites and saves the animation or the cell map selected during the project. |
| Save As | It saves the animation or the cell map currently-selected during the project as another name. |
| Save All | It overwrites and saves all the data existing in the currently-creating project and the project. |
| Preferences | It opens the window to set “OPTPiX SpriteStudio” and the initial state when the project is newly created. |
| Open Recent Projects | Recent project files are listed and the project file desired to be read can be selected from among them. |
| Exit SpriteStudio | It closes “OPTPiX SpriteStudio”. |
[Edit]Menu
This is the menu to do Copy (Cut) & Paste and Re-Try (Undo/Redo) of operation.
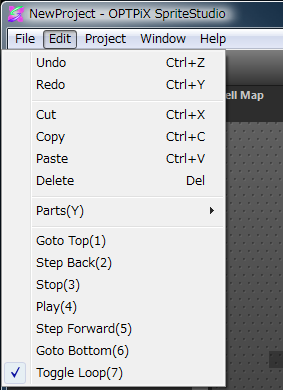
| Undo | It cancels the operation related to the currently-working data and return to the one-step previous state. By executing it plural times, the state of the same undo-operation times will be restored. However, there is a limit of undo times. |
|---|---|
| Redo | The operation canceled by the “Undo” will be recovered once again. By executing it plural times, the operation of the same times will be executed. However, there is a limit of undo times. Also, when another operation was done after choosing “Undo”, the operation before doing another operation cannot be executed once again. A care must be taken. |
| Cut | It deletes parts inside the currently-chosen Frame Control Window and also letters, numbers, etc. inside respective windows after copying them to the clipboard. The copied objects can be pasted to another place by the “Paste”. |
| Copy | It copies parts inside the currently-chosen Frame Control Window and also letters, numbers, etc. inside the respective windows to the clipboard. The copied objects can be pasted to another place by the “Paste”. Different from the “Cut”, those items are not deleted. |
| Paste | It pastes the “Cut” or “Copy” data to the specified position. Whether overwrite or add upon pasting will depend upon the pasted object. |
| Delete | It deletes the currently-selected object and letters and number inside the respective windows. |
| Goto Top | It rewinds animation to its lead frame. The cursor (yellow vertical bar) in the timeline area also returns to the top. |
| Step Back | It puts animation one frame back from the current position. The cursor (yellow vertical bar) in the timeline area also returns one frame back. |
| Stop | It stops the play when the display is at the Play state. When animation is stopped, the cursor (yellow vertical bar) in the timeline area also shifts. |
| Play | It plays animation from the current position. |
| Step Forward | It put animation one frame forward from the current position. The cursor (yellow vertical bar) in the timeline also advances one frame forward. |
| Goto Bottom | It advances animation to the last frame. The cursor (yellow vertical bar) in the timeline also shifts to the last frame. |
| Toggle Loop | It switches either to stop Play upon reaching the last frame or repeat Play by returning to the top, when animation is played. |
Note:A care must be taken because the following operations are not handled by “Undo” and “Redo”.
- All the operations executed in the project windows except for “Change Reference Image” for the Cell Map.
- Changes executable on the toolbar buttons of Cell Map Window and Layout Window.
[Project]Menu
This is the menu to input/output data files of animation, cell map, etc. for the currently-working project.
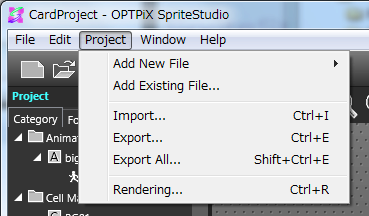
| Add New File |
It newly adds animation and cell map to the currently-working project. * Animation It creates and adds new animation to the project. The dialog for specifying newly created animation filename will open, so specify the filename and click the Save. Then, a new animation will be added to the project. * Cell Map It creates and adds new cell map to the project. The dialog for selecting the image file to be used in the newly-created cell map will open, so select the image file and click the [Open]. Then, a new cell map will be added to the project. |
|---|---|
| Add Existing File | It adds animation and cell map file of the existing project to the currently-working project. When the cell map file outside the folder (“Project Folder”) which is stored in the present project is added and if the reference image used by the cell map cannot be found in the project folder, an error occurs. In this instance, copy the image file referenced by the cell map file to be added to the project folder and add the object cell map file or use “Import” function. |
| Import | It newly adds the animation file (.ssax) for the existing old version, reference image, etc. to the project. The dialog for selecting the imported .ssax and the file of reference image will open. So, select the object file and click the [Open]. Next, the dialog for registering the selected file to the current project will open. So, specify the filename and click the “Save”. Then, the import of specified file will be completed. |
| Export |
It outputs the specified file from the currently-working project in the form of the animation file (.ssax) for the old version. To implement Export, select either the object animation or cell map on the Project Window. If nothing is selected, nothing will happen even if the “Export” is selected. The output .ssax file will become compatible with the “SpriteStudio Ver. 4”, so the following key frame information isn’t output.
As for the details of the export setting window, refer to Export Setting Window section. |
| Export All | It outputs all the animation data of the working project, together with the reference image file, in the old version animation format. Restrictions of this instance are the same as the above “Export”. The destination folder is the folder specified by the ‘Export Setting Window’ of the above “Export”. If not set, the output will be made to the same folder as the currently-working project. |
| Rendering | The respective frames of the working animation data are output as the serial-number PNG file. The details can be referred to The ‘Rendering’. |
[Window]Menu
This is the menu to set Show/Hide, etc. of “OPTPiX SpriteStudio” various function windows.
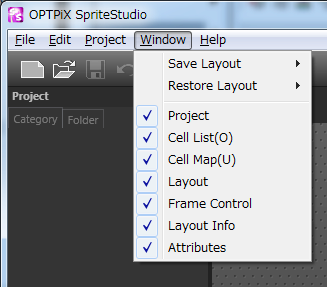
| Save Layout | It saves the current window’s layout. The maximum of three can be saved. So, select the save destination from “Layout 1” to “Layout 3”. |
|---|---|
| Restore Layout |
It restores the window to the layout stored by the “Save Layout”. When “Layout1” – “Layout3” are selected, the window layouts saved in advance will be restored. On the other hand, when the “Default” is selected, the window layout will become the initial state (at product delivery). By selecting from “Layout 1” to “layout 3”, and when “Default” is selected in the already-saved layout, the layout will be done at the initial state of “OPTPiX SpriteStudio”. |
| Project | It switches Show/Hide of the “Project” window. When it is marked, it indicates Show, and when unmarked, Hide. |
| Cell List | It switches Show/Hide of the “Cell List” window. When it is marked, it indicates Show, and when unmarked, Hide. |
| Cell Map | It switches Show/Hide of the “Cell Map” window. When it is marked, it indicates Show, and when unmarked, Hide. |
| Layout | It switches Show/Hide of the “Layout” window. When it is marked, it indicates Show, and when unmarked, Hide. |
| Frame Control | It switches Show/Hide of the “Frame Control” window. When it is marked, it indicates Show, and when unmarked, Hide. |
| Layout Information | It switches Show/Hide of the “Layout Information” window. When it is marked, it indicates Show, and when unmarked, Hide. |
| Attributes |
It switches Show/Hide of the “Attributes” window. When it is marked, it indicates Show, and when unmarked, Hide. |
[Help]Menu
This is the menu to confirm and set “OPTPiX SpriteStudio” use, various information, license information, etc.

| Help | It opens the WWW browser and shows this Help. |
|---|---|
| SpriteStudio Website | It opens the WWW browser and shows “OPTPiX SpriteStudio” website . |
| User Support Website | It opens the WWW browser and shows “OPTPiX SpriteStudio” User Support website . |
| Check for Updates | It connects to our INTERNET server and shows update information of “OPTPiX SpriteStudio” and other various information. |
| Manage License | It confirms and sets the license state of “OPTPiX SpriteStudio”. By selecting this menu, the “Manage License” window will open. The necessary confirmation and settings can be done in this window. |
| About SpriteStudio | It shows the information of the using “OPTPiX SpriteStudio” version. |
[Toolbar]
The group of toolbar buttons located just under the main menu performs mainly shortcut to frequently used functions .
![]()
| This is the same as the [File] Menu’s “New Project”. | |
| This is the same as the [File] Menu’s “Open Project”. | |
| This is the same as the [File] Menu’s “Save”. | |
| This is the same as the [Edit] Menu’s “Undo”. | |
| This is the same as the [Edit] Menu’s “Redo”. |