
The Main Menu provides functions for working with the entire “OPTPiX SpriteStudio”. The Main Menu consists of a menu bar (menu section) and a toolbar.

- File Menu
- Edit Menu
- Project Menu
- Animation Menu
- Window Menu
- OPTPiX Labs Menu
- Help Menu
- Toolbar
- Related Pages
File Menu
This menu allows you to control the reading, saving, and setting of project files, and to exit “OPTPiX SpriteStudio”.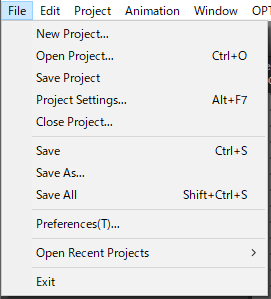
| New Project | It closes the editing project and creates new project. |
|---|---|
| Open Project | It reads in the existing project file. |
| Save Project | It saves all the data of the currently-working project. |
| Project Settings |
The Project Settings Window opens. Select to change the settings for the project you are currently working on. |
| Close Project | It closes the currently-working project. |
| Save | Saves the Animation or Cell Map selected in the project window by overwriting it. |
| Save As | Saves the Animation or Cell Map selected in the Project window under a different name. |
| Save All | It overwrites and saves all the data existing in the currently-creating project and the project. |
| Preferences |
The Preferences Window opens. Choose this to set preferences when using OPTPiX SpriteStudio and the initial state when creating a new project. |
|
Open Recent Project |
Recent project files are listed and the project file desired to be read can be selected from among them. |
| Exit | It closes “OPTPiX SpriteStudio”. |
Edit Menu
This is the menu to do Copy (Cut) & Paste and Re-Try (Undo/Redo) of operation.
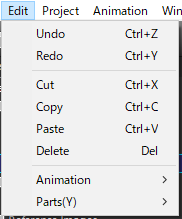
Note: The following actions are not covered by “Undo” “Redo”. Please be careful.
- Operations on the cell map in the project window other than “Change Reference Image”
- Changes you can make with the toolbar buttons in the cell map and layout windows
Project Menu
This menu allows you to add Animation, Cell Maps, and other data files to your project, and to convert animation data to recommended data at once.
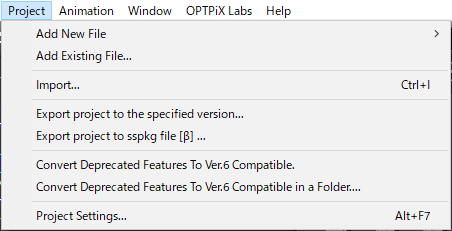
| Add New File |
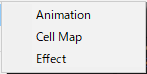
Add new animation, cell map, and effect to your project. AnimationAdd a new ssae (Animation File) to the project. A dialog will appear asking for the file name of the newly created ssae. Specify the file name and click “Save”. Cell MapAdd a new ssce (Cell Map File) and its Reference Image to the project. Opens a dialogue box to select an image file to reference from the cell map. Select the image file and click “Open”. EffectAdd a new ssee (Effect File) to the project. A dialog will appear asking for the file name of the newly created ssee. Specify the file name and click “Save”. |
|---|---|
| Add Existing File |
Lets you select and add Animation, Cell Map, and Effect files from an existing project to the active project. If you add a cell map file that is saved outside the current project’s folder, an error occurs if the cell map you are adding uses a reference image that does not exist in the current project’s folder. In this case, copy the image file referenced by the Cell Map file you are adding to the current Project Folder, and then add the desired Cell Map file or use the “Import” feature to add the Referenced Image. |
| Import |
Adds an existing image file to the project as a new file. In the dialog box that appears, select the file you want to import and click “Open”. |
| Export to the specific version |
The Export to the specific version Window opens. The “Export to the specific version” feature can be used to export SpriteStudio data in an older version of the format. |
| Convert Deprecated Features to Ver.6 Compatible. |
This is the ability to convert deprecated attributes in the animation data you are currently editing to Ver.6 compatible attributes all at once. Please refer to the following link for details. |
| Convert Deprecated Features to Ver.6 Compatible in a Folder. |
This function converts the deprecated attribute of the animation files in the specified folder to the compatible attribute in Ver.6. Please refer to the following link for details. |
Animation Menu
This menu allows you to control animation playback and output images and video.
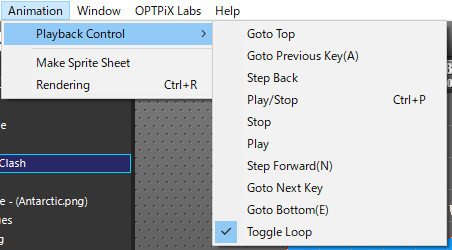
| Playback Contorol |
This menu controls animation playback. Goto TopMoves the playback position back to the first frame. Goto Previous KeyMoves the playback position back to the position of the key before the selected frame. Step BackMoves the playback position back one frame from its current position. Play/StopIf the animation is stopped, play it. If the animation is playing, stop it. PlayPlays the animation starting at the selected frame. StopStop the animation. If the animation is playing, move the cursor to that frame and stop. Step ForwardAdvances the playback position by one frame from the current position. Goto Next KeyAdvances the playback position from the current position to the next frame where the key resides. Goto BottomAdvance the playback position to the last frame. Toggle LoopSets whether the animation plays repeatedly. When you play an animation, you can switch between stopping at the last frame of the animation or going back to the beginning and repeating the animation again. |
|---|---|
| Make Sprite Sheet | The Make Sprite Sheet Window opens. |
| Rendering | The Rendering Window opens. |
Window Menu
This menu allows you to perform operations on windows such as displaying or hiding each window.
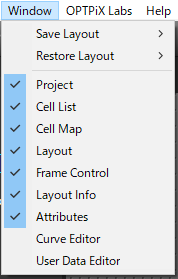
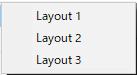
| Save Layout |
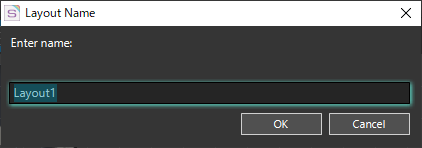
Saves the current window arrangement. You can save up to three types. Select a storage location from “Layout1” to “Layout3”. After selecting the save destination, a dialog appears for entering the layout name.
Enter Name:You can enter any layout name. OKSaves the window arrangement under the layout name you entered and closes the dialog. CancelClose the dialog without saving. |
|---|---|
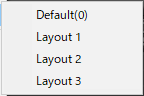
| Restore Layout |
Repositions the window to the layout saved in “Save Layout”. Select “Layout1”, “Layout2” or “Layout3” to arrange the windows in the saved layout. Select “Default” to arrange the windows in the initial state of “OPTPiX SpriteStudio”. |
| Project |
It switches Show/Hide of the Project Window. When it is marked, it indicates Show, and when unmarked, Hide. |
| Cell List |
It switches Show/Hide of the Cell List Window. When it is marked, it indicates Show, and when unmarked, Hide. |
| Cell Map |
It switches Show/Hide of the Cell Map Window. When it is marked, it indicates Show, and when unmarked, Hide. |
| Layout |
It switches Show/Hide of the Layout Window. When it is marked, it indicates Show, and when unmarked, Hide. |
| Frame Contorol |
It switches Show/Hide of the Farme Contorol Window. When it is marked, it indicates Show, and when unmarked, Hide. |
| Layout Info |
It switches Show/Hide of the Layout Info Window. When it is marked, it indicates Show, and when unmarked, Hide. |
| Atribute |
It switches Show/Hide of the Atribute Window. When it is marked, it indicates Show, and when unmarked, Hide. |
| Curve Editor |
It switches Show/Hide of the Curve Editor Window. When it is marked, it indicates Show, and when unmarked, Hide. |
| User Data Editor |
It switches Show/Hide of the User Data Editor Window. When it is marked, it indicates Show, and when unmarked, Hide. |
OPTPiX Labs Menu
This menu allows you to use the functions provided by “OPTPiX Labs” or browse to the “OPTPiX Labs” website.
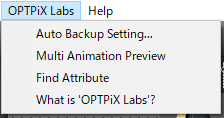
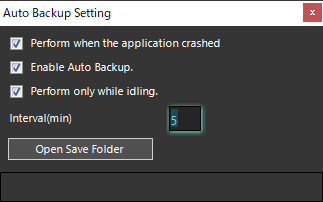
| Auto Backup Setting |
The Auto Backup Setting dialog opens.
Perform when the application crashedBack up data when exceptions occur, such as access violations. Enable Auto Backup.Each time the time specified by “Backup Interval” elapses, the currently edited data is saved in a specific folder. Perform only while idling.Performs a backup after a period of inactivity. Interval(min)Sets the number of minutes between backups. Open Save FolderOpen the folder that contains the files you backed up. |
|---|---|
| Multi Animation Preview |
The Multi Animation Preview Window opens. |
| Find Attribute |
The Select Attribute Window opens. You can check multiple attributes at once. |
| What is ‘OPTPiX Labs’? |
Open a web browser to theOPTPiX Labs (Japanese). |
Help Menu
This menu allows you to check the license information and link to various “OPTPiX SpriteStudio” information pages.
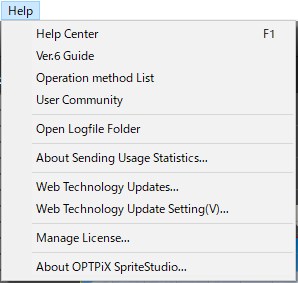
| Help Center |
Open a web browser to the OPTPiX SpriteStudio Help Center. |
|---|---|
|
Ver.6 Guide |
Open a web browser to the About OPTPiX SpriteStudio Ver.6. |
| Operation method List |
Open a web browser to the Shortcut keys. |
| User Community |
Open a web browser to the OPTPiX SpriteStudio Community. |
| Open Logfile Folder |
Open the folder that contains the log file (SpriteStudio.log). |
| About Transmission of Usage Statistics |
The About Transmission of Usage Statistics Window opens.
|
| Web Technology Update |
The Web Technology Update Window opens. This window will guide you to the latest OPTPiX SpriteStudio update. You can also see the announcement from Web Technology. |
| Web Technology Update Settings |
The Web Technology Update Settings Window opens. You can set the display of “Web Technology Update Window” when you start SpriteStudio.
|
| Manage License |
The Manage License Window opens. |
| About OPTPiX SpriteStudio |
The About OPTPiX SpriteStudio dialog opens. You can find the version, expiration date, and serial number of your OPTPiX SpriteStudio.
|
Toolbar
The toolbar buttons, located just below the menu bar, provide shortcuts to frequently used functions.
![]()
New Project |
Same as “New Project” in the File Menu. |
|---|---|
Open Project |
Same as “Open Project” in the File Menu. |
|
Same as “Save” in the File Menu. |
|
|
|
Same as “Save All” in the File Menu. |
|
Same as “Undo” in the Edit Menu. |
|
|
Same as “Redo” in the Edit Menu. |
Related Pages
- Project Settings Window
Describes the features of the Project Settings Window. - Manage License Window
Describes the features of the Manage License Window. - Describes how to use the Auto Backup Data feature(Japanese)
Describes the “Auto Backup” feature.