
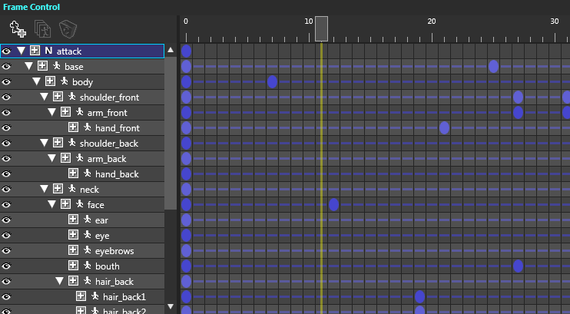
The “Frame Control” Window is the window to implement of the operation of the inheritance relation of the currently-working animation parts and key frame, etc, on the timeline.
This window is largely comprised of the following four regions.
Upper Toolbar
![]() On the toolbar of the Frame Control Window, mainly buttons to operate the “Create/Delete Parts” are accommodated.
On the toolbar of the Frame Control Window, mainly buttons to operate the “Create/Delete Parts” are accommodated.
|
|
It adds NULL parts. Depending upon the currently-selected parts, the added position of the NULL parts will be different. * When the root parts being selected A new NULL parts is created as a child of the root parts. * When parts of non-root parts being selected A new NULL parts is created at the same inheritance level as the selected parts. |
|---|---|
|
|
It duplicates and adds the parts selected currently in the Parts Select Area as the child parts of the same parent parts. |
|
|
It deletes the parts selected currently in the Parts Select Area. |
The Parts Select Area
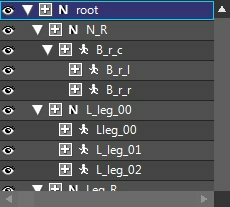 In the Parts Select Area, the “Parts Inheritance” and “Parts Operated” are selected.
Switch of Show/Hide in Layout Window
At the left edge of each parts, the “Eye-shape Icon” is shown. By clicking this icon, the state of Show/Hide of the parts in the layout window can be switched alternately.
At the ![]() state, the related parts is shown in the layout window. At the
state, the related parts is shown in the layout window. At the ![]() state, the related parts are not shown in the layout window.
state, the related parts are not shown in the layout window.
To be noted, this function is the switching function of Show/Hide for the work in the Layout Window, having no affect upon the “Hide” of the parts’ attributes.
Expand Child Parts
By clicking the triangular icon located at the front of the parts name, the switching of the Show or Not of the child parts of the related parts (i.e., Expand Tree or Not) is enabled.
The  means the state of showing also the child parts. The
  means the state of not showing the child parts.
Develop Attribute Used
By clicking the square icon on the right of the triangular icon, it switches Show or Not of the list of attributes used by the parts. When the icon is  , the list of attributes used by every frame of each parts is shown. When
  , the list is not shown (Hide).
Kinds of Parts
In front of the parts name, there is an icon  or
or  . The means that the parts is NULL parts. The means that the parts is a normal parts.
The basic operation in the Parts Select Area is as follows:
Select Parts
By clicking the parts’ name, it is possible to make the parts at the selected state.
Select Plural Parts
By repeating CTRL+Click, it is possible to make selection so as to add to the parts selected until then. Also, From among the parts being at the plural select state, with CTRL+Click of the objective parts, the selected state of the parts can be cancelled.
Select Plural Parts within Range
After clicking the parts which becomes the start point of the range, if another parts, which becomes the end point, is SHIFT+clicked, it is possible to select all the parts between the two points.
Change the Position of Parts’ Inheritance Relation
By dragging and dropping the selected parts into the desired destination, the position of the parts’ inheritance relation can be changed. Depending upon “Which parts becomes the parent”, the moving destination of the parts is different. Also, if the selected parts have child parts, the move is done together with the child parts.
Make it as child of another parts
When setting the selected parts as another parts’ child, drop the parts onto the parts that becomes the parent. When the selected parts is overlapped onto the parent parts, the background turns into blue. So, drop thereto.
Moving the parts in-between parts
When the selected parts is desired to move to in-between another parts, drop the parts onto the boundary line in-between those parts. By bringing the selected parts onto the boundary line, the boundary line turns into blue color. Then, drop thereto. The parts is inserted in-between, and the position of the inheritance relation moves.
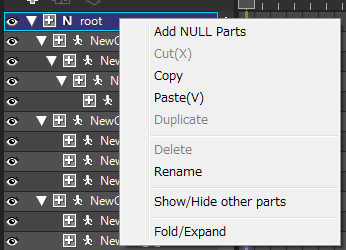 Also, with right click of the parts name, the exclusive-use menu will open.
| Add NULL Parts | This is the same function as the above toolbar’s “Add NULL Parts”. |
|---|---|
| Cut | After copying all the selected parts and its child parts to the clipboard, all the parts are deleted from the frame control window’s layout window. |
| Copy | All the selected parts and its child parts are copied to the clipboard. |
| Paste | The parts copied to the clipboard by “Paste” or “Cut” are added to the same level position as the currently selected parts. |
| Duplicate | Duplicates of all the selected parts and its child parts are added to the same level position as the currently selected parts. |
| Delete | All the currently-selected parts and its child parts are deleted. |
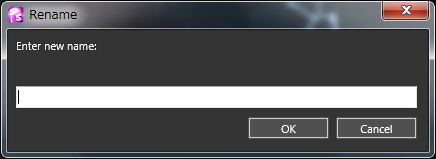
| Rename |
It changes parts’ name. The dialog to input the name will open. So, input a new name. Then, the name of the parts will be renamed.
|
| Fold/Expand | It switches to either the part’s child parts is shown or not (i.e., expand to the tree or not). It is the same as clicking the triangle in front of the parts’ name. Also, when the child parts is at the Show state, the check mark will be attached to the front of this item. |
Timeline Area
In the timeline area, the settings, delete, and move of the key frame are mainly implemented.
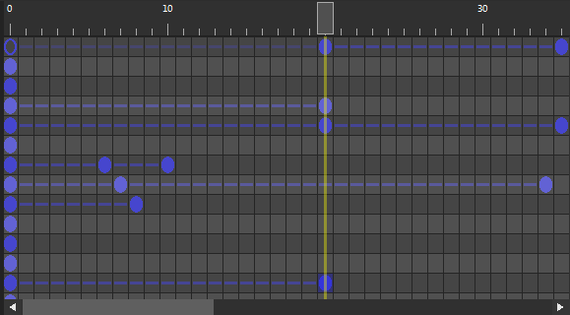
The following operations can be done in the timeline area.
Set New Key Frame
By double-clicking the position with no setting of the key frame of the timeline area, a key frame is newly set at the position. When a new key frame is created, it becomes possible to use attributes specified by the “General-Misc” of the “Project Setting” & “Environmental Setting” Window. Also, when the key frame is added in-between the two key frames, the new frame’s value will be set on account of considering the interpolated value of the attribute of the afore- and after- key frames.
Settings of the “Hide” Attribute of the Existing Key Frames
By double-clicking the already-existing, it is possible to switch the “Hide” attribute’s state of the key frame (i.e., after it until resetting). When the key frame is shown with the filled violet round mark, it means “Show State (Hide OFF)”. When shown with the outlined violet round mark, it means “Hide State (Hide ON)”.
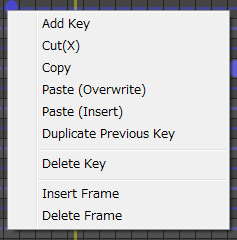 Also, with right-click in the timeline area, the exclusive-use menu will open.
| Add Key | A new key frame is created at the currently-selected position (turned over to blue). |
|---|---|
| Cut | It copies the selected key frame to the clipboard and deletes from the current timeline. After it is deleted, the frame becomes a general frame. Its attribute value is interpolated from the before- and after- key frames’ values. |
| Copy | It copies the selected key frame to the clipboard. |
| Paste (Overwrite) | It overwrites (pastes) the key frame copied to the clipboard by the “Cut” or “Copy” onto the same position. The original value is overwritten and lost. |
| Paste (Insert) | It insert the key frame copied to the clipboard by the “Cut” or “Copy” onto the same position. Frames after that position all shift every one frame afterward and the parts’ animation end frame also shifts one frame afterward. |
| Duplicate Previous Key | It duplicates the key frame of the front frame located nearest to that position at the same position. When the position with nothing was selected, a new frame having the same content of the front frame will be created. When the key frame was selected, the content of the frame located before the key frame will be overwritten and set on the selected frame. |
| Delete Key | It deletes the selected key frame. After it was deleted, the frame becomes a general frame, and the attribute value is interpolated from the values of the before- and after- key frames. |
| Insert Frame | A general frame is inserted to all the parts at the current position (shown by the yellow vertical bar). By this, the length of the animation increases by one frame. |
| Delete Frame | All the parts at the current position (shown by the yellow vertical bar) are deleted. By this, the length of animation is reduced by one frame. |
Lower Toolbar
The lower toolbar is the window to implement operations of settings of the number of frames and the unit time of the whole animation and also the settings of the display frame position on the layout window.

Set Animation
Total Number of Frames
The length of the whole animation is set by the number of frames. The actual length of animation is “Total Number of Frames / Unit Time Numeric Value” seconds. For example, in case of the total number of frames: 15 and the unit time value: 30, it is 0.5 seconds.
Unit Time
It sets “How many times a second (Frames Per to Second, FPS, fps) to renew” the animation. Input numeric value directly, or select from the Pull-down Menu.
Operation of the Display Frame Position on the Layout Window
The explanation of the respective buttons is made from the left to the right in turn, facing the image.
 Goto Top Goto Top |
It winds back the animation to the top frame. The cursor (yellow vertical bar) of the timeline area also returns to the top. |
|---|---|
 Step Back Step Back |
It moves animation 1 frame back from the current position. The cursor (yellow vertical bar) of the timeline area also moves back by the 1 frame. |
 Stop Stop |
When the display is at the Play state, it stops the Play. The cursor (yellow vertical bar) of the timeline area also moves to the position where the animation stopped. |
| It plays animation from the current position. | |
| It advances animation 1 frame from the current position. The cursor (yellow vertical bar) of the timeline area also advances by the 1 frame. | |
| It pushes forward animation up to the end frame. The cursor (yellow vertical bar) of the timeline area also moves to the end frame. | |
| When animation is played again, it switches either the Stop after reaching the end frame or Return to the top and repeat the Play. When the button’s background is “blue”, it does the looped play. | |
| It enlarges the display of the timeline area in the horizontal direction. | |
| It reduces the display of the timeline area in the horizontal direction. |