
EXEpress 6 can be started in a variety of ways.
Start by dropping an archive file
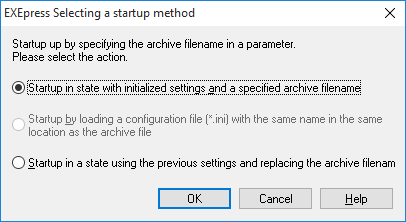 The dialog box at right is displayed when EXEpress 6 is started by dropping an archive file (*.cab) on the EXEpress 6 icon.
| Start by initializing settings and specifying the archive file name |
After selecting [Settings] > [Initialize Settings] on the Main Menu, the program starts in the same state as when entering the archive file that is dropped. |
|---|---|
| Start by loading the configuration file (*.ini) with the same name and in the same location as the archive file |
Starts in the same state as when the configuration file (*.ini) with the same name as the archive file is loaded in the main dialog box. |
| Start in a state of changing the archive filename and using the previous settings |
Start in the same state as when entering the name of the archive file that is dropped while keeping the settings when the previous run completes. |
Select one and click on the [OK] button to open the EXEpress 6 main window.
Start by dropping the configuration file
When EXEpress 6 is started by dropping the configuration file (*.ini) on the EXEpress 6 icon, the self-extracting executable file is created according to the content of the configuration file and exits without displaying the EXEpress 6 main window.
Start by specifying command line arguments
The program can be started by passing the EXEpress 6 execution file “exepress.exe” to an argument.
- Passing the archive file to an argument is the same as starting by dropping the archive file.
- Passing the configuration file to an argument is the same as starting by dropping the configuration file.
This is convenient for creating short cuts or batch files to “automatically create a self-extracting executable file.”
Start by using [Send to] in Explorer.
If EXEpress 6 is saved in [Send to] in Explorer, EXEpress 6 can be started immediately by selecting an archive file or configuration file in Explorer.
EXEpress 6 can be saved in [Send to] by saving an EXEpress 6 shortcut in the following folder.
\Users\UserName\AppData\Roaming\Microsoft\Windows\SendTo
Command line specified operation for EXEpress Compressor
By specifying a command line in EXEpress 6 Compressor (epcomp.exe) and starting, the archive file can be automatically generated.
By specifying the following as an option when executing from the command line specifying an ini file,
/ArchiveFile:[Filename]
the source CAB file used for processing can be switched from the one specified in the ini file.
Also, when specifying
/OutputFile:[Filename]
the filename of the output self-extracting EXE file can be switched from the one specified in the ini file.
Note that command parameters can be specified in any order.
Specifying configuration file(epc file)
When the EXEpress Compressor configuration file (epc file) name is passed to the command line, EXEpress Compressor starts by loading the specified epc file.
Compression by directly specifying folder name
When the folder name and output archive filename are passed to the command line, the files in the specified folder are compressed and output with the specified archive filename.
The output archive filename can be omitted, and in this case a file named “(source folder name).cab” is output in the source folder.
The output results are determined by the error code.
example:
  epcomp c:\folder d:\out.cab
  → Compress c:\folder then output d:\out.cab

  epcomp c:\folder
  → Compress c:\folder then output c:\folder.cab
Auto Compression by specifying epc file
All compression processes are performed automatically when the /compress switch, epc filename, and output archive filename are all three specified.
The output archive filename can be omitted. When it is omitted, a file with the name of epc file with cab as the extension is used as the archive file.
example:
  epcomp /compress c:\sample.epc d:\out.cab
  → Output d:\out.cab

  epcomp /compress c:\sample.epc
  → Output c:\sample.cab
Other Command
/silent
Specify this switch so that status display dialogs and error messages are not displayed during processing.
For example, this can be used so that extraneous error message types are not displayed during batch processing.
Error codes (Return value)
The error codes can be obtained with the ERRORLEVEL variable for Windows batch files.
| Error codes |
Return value |
|---|---|
| 0 |
Successful completion |
| 101 |
The epc filename was not specified during automatic compression |
| 102 |
The XML load engine failed to initialize during automatic compression |
| 103 |
The epc file failed to load during automatic compression |
| 104 |
No compression source file exists during automatic compression |
| 105 |
The source data was defective (the tree structure was not followed) during automatic compression |
| 301 |
The specified folder information was corrupted during folder specified automatic compression |
| 302 |
The archive file failed to output during folder specified automatic compression |