JINS PC を使い始めました。普段はメガネをかけていないため、レンズに照明がうつり込むのが気になる、耳が痛い、と気になって気になってしかたがない yone です。効果があればよいのですが。
1. オレオレ認証局の活用
前回の記事で、オレオレ認証局 (プライベート認証局) の構築と、それを使ったウェブサーバ証明書の発行を紹介しました。記事の最後に、その他の証明書活用を紹介しましたが、今回はそのなかから「クライアント証明書」の事例を解説します。

ウェブテクノロジのサーバやネットワークのお守りをしている yone です。今後、社内で実際に使っているソフトウェア・設定・構成などの豆知識のご紹介をしていきたいと思っています。巷にある情報の再掲になりますが、実稼働事例の一つとしてご参考になれば幸いです。
HTTPS を使ったウェブサイトを立ち上げるとき、SSL サーバ証明書屋さんからサーバ証明書を購入するのが普通です。
ところが、会社内や特定のメンバー内だけで利用するサーバであれば、必ずしも証明書屋さんから証明書を購入する必要はないのです。
今回は、証明書屋さんから買わずに自前で証明書屋さんを作って自前で証明書を発行し、HTTPS サイトを立ち上げる方法をご紹介します。
その証明書の正式名称は、自己署名証明書ですが、本稿ではオレオレ証明書と表記することにします。(笑)
試しに、「オレオレ証明書」で検索してみてください。ジャーゴンとして、意外と広く使われているようです。
同様に、自前の証明書屋さんはオレオレ認証局と表記します。こちらも正式な名称ではありません。
ウェブサイトの URL の先頭が、https:// となっている場合、SSL または TLS を利用しています。このときの主な特徴は下記のようになります。
証明書屋さんへお金を払って証明書を買うのはなぜでしょうか。それは、2番目のサーバ認証のためです。このサーバは本物だぞと、証明書屋さんが太鼓判を押しているのです。
特定のメンバー内だけで使う場合、事前にオレオレ証明書を「この証明書は本物や!」と配布しておけば、証明書屋さんから購入したサーバ証明書と同様に使えちゃったりします。
不特定多数がアクセスするウェブサイトに使うのは不適切です。諦めて、証明書屋さんから購入しましょう。

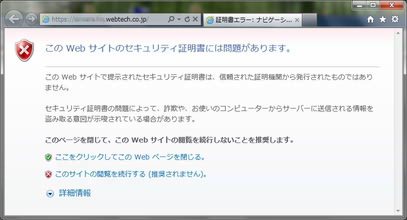
サーバー証明書エラーの画面
実は CentOS 5 の場合、mod_ssl パッケージをインストールするとオレオレ証明書で稼動状態になります。が、そのままアクセスすると警告を表示してしまいます。
この難局に立ち向かう術は2つあります。
サーバの数が多くないのであれば前者でもよいのですが、いくつもいくつもある場合は認証局を作ってしまいましょう。認証局の登録を一回行えば、他の登録作業はなくなります。
ここでは CentOS5 上で新規構築します。一度だけの実施です。下記は、exampleCA という名称で作成した例です。
# cd /etc/pki
# mkdir exampleCA
# cp tls/misc/CA exampleCA/
# cp tls/openssl.cnf exampleCA/
# echo 01 > exampleCA/crlnumber
/etc/pki/exampleCA/CA ファイルを修正します。
SSLEAY_CONFIG="-config /etc/pki/exampleCA/openssl.cnf"   ← 追加
DAYS="-days 365"        # 1 year
CADAYS="-days 1095"     # 3 years
REQ="openssl req $SSLEAY_CONFIG"
CA="openssl ca $SSLEAY_CONFIG"
VERIFY="openssl verify"
X509="openssl x509"

CATOP=/etc/pki/exampleCA   ← 修正
(中略)
-newca)
(中略)
    $CA -out ${CATOP}/$CACERT $CADAYS -batch \
        -extensions v3_ca \   ← 追加
        -keyfile ${CATOP}/private/$CAKEY -selfsign \
        -infiles ${CATOP}/$CAREQ
/etc/pki/exampleCA/openssl.cnf ファイルを修正します。
[ CA_default ]
dir             = /etc/pki/exampleCA    # Where everything is kept   ← 修正
(中略)
[ req_distinguished_name ]
countryName                    = Country Name (2 letter code)
countryName_default            = JP   ←修正
countryName_min                = 2
countryName_max                = 2

stateOrProvinceName            = State or Province Name (full name)
stateOrProvinceName_default    = Tokyo   ←修正

localityName                   = Locality Name (eg, city)
localityName_default           = Toshima-ku   ←修正

0.organizationName             = Organization Name (eg, company)
0.organizationName_default     = Example Corp.   ←修正
(中略)
[ usr_cert ]
basicConstraints=CA:FALSE
keyUsage = digitalSignature, keyEncipherment   ←追加
extendedKeyUsage = serverAuth   ←追加
# nsComment                    = "OpenSSL Generated Certificate"   ←コメントアウト
subjectKeyIdentifier=hash
authorityKeyIdentifier=keyid,issuer
(中略)
[ v3_ca ]
keyUsage = cRLSign, keyCertSign   ←コメント削除
秘密鍵・公開鍵・自己署名証明書を生成します。
# cd /etc/pki/exampleCA
# ./CA -newca
mkdir: cannot create directory `/etc/pki/exampleCA': File exists
CA certificate filename (or enter to create)
(そのままEnter)
Making CA certificate ...
Generating a 1024 bit RSA private key
...++++++
...........++++++
writing new private key to '/etc/pki/exampleCA/private/./cakey.pem'
Enter PEM pass phrase:CAパスフレーズを入力
Verifying - Enter PEM pass phrase:CAパスフレーズを入力
-----
You are about to be asked to enter information that will be incorporated
into your certificate request.
What you are about to enter is what is called a Distinguished Name or a DN.
There are quite a few fields but you can leave some blank
For some fields there will be a default value,
If you enter '.', the field will be left blank.
-----
Country Name (2 letter code) [JP]:
State or Province Name (full name) [Tokyo]:
Locality Name (eg, city) [Toshima-ku]:
Organization Name (eg, company) [Example Corp.]:
Organizational Unit Name (eg, section) []:
Common Name (eg, your name or your server's hostname) []:example CA
Email Address []:

Please enter the following 'extra' attributes
to be sent with your certificate request
A challenge password []:
An optional company name []:
Using configuration from /etc/pki/exampleCA/openssl.cnf
Enter pass phrase for /etc/pki/exampleCA/private/./cakey.pem:CAパスフレーズを入力
Check that the request matches the signature
Signature ok
Certificate Details:
        Serial Number: 0 (0x0)
        Validity
            Not Before: Aug  1 10:34:25 2007 GMT
            Not After : Jul 31 10:34:25 2010 GMT
        Subject:
            countryName               = JP
            stateOrProvinceName       = Tokyo
            organizationName          = Example Corp.
            commonName                = example CA
        X509v3 extensions:
            X509v3 Subject Key Identifier:
                xx:xx:xx:xx:xx:xx:xx:xx:xx:xx:xx:xx:xx:xx:xx:xx:xx:xx:xx:xx
            X509v3 Authority Key Identifier:
                keyid:xx:xx:xx:xx:xx:xx:xx:xx:xx:xx:xx:xx:xx:xx:xx:xx:xx:xx:xx:xx
                DirName:/C=JP/ST=Tokyo/O=Example Corp./CN=Example CA
                serial:00

            X509v3 Basic Constraints:
                CA:TRUE
            X509v3 Key Usage:
                Certificate Sign, CRL Sign
Certificate is to be certified until Jul 31 10:34:25 2010 GMT (1095 days)

Write out database with 1 new entries
Data Base Updated
# mv careq.pem certs/00.pem
# openssl ca -config openssl.cnf -gencrl -out crl.pem
これで準備完了です。
| 説明 | ファイル名 |
|---|---|
| CA 証明書 | cacert.pem, newcerts/00.pem |
| CA 秘密鍵 | private/cakey.pem |
| CA 証明書発行要求 | certs/00.pem |
ではさっそく、サーバ証明書を作ってみます。https://www.example.jp/ 用の証明書の発行例です。
# cd /etc/pki/exampleCA
# ./CA -newreq
Generating a 1024 bit RSA private key
.........++++++
...........................++++++
writing new private key to 'newreq.pem'
Enter PEM pass phrase:パスフレーズを入力
Verifying - Enter PEM pass phrase:パスフレーズを入力
-----
You are about to be asked to enter information that will be incorporated
into your certificate request.
What you are about to enter is what is called a Distinguished Name or a DN.
There are quite a few fields but you can leave some blank
For some fields there will be a default value,
If you enter '.', the field will be left blank.
-----
Country Name (2 letter code) [JP]:
State or Province Name (full name) [Tokyo]:
Locality Name (eg, city) [Toshima-ku]:
Organization Name (eg, company) [Example Corp.]:
Organizational Unit Name (eg, section) []:
Common Name (eg, YOUR name) []:www.example.jp
Email Address []:

Please enter the following 'extra' attributes
to be sent with your certificate request
A challenge password []:
An optional company name []:
Request is in newreq.pem, private key is in newkey.pem

# ./CA -sign
Using configuration from /etc/pki/exampleCA/openssl.cnf
Enter pass phrase for /etc/pki/exampleCA/private/cakey.pem:CAパスフレーズを入力
Check that the request matches the signature
Signature ok
Certificate Details:
        Serial Number: 3 (0x3)
(中略)
Certificate is to be certified until Sep 30 07:12:47 2005 GMT (365 days)
Sign the certificate? [y/n]:y

1 out of 1 certificate requests certified, commit? [y/n]y
Write out database with 1 new entries
Data Base Updated
Certificate:
    Data:
        Version: 3 (0x2)
(中略)
Signed certificate is in newcert.pem
# ls newcerts
01.pem  02.pem  03.pem  (←一番大きな値のファイルを探す)
# mv newreq.pem certs/03.pem (←探したファイル名を入れる)
# mv newkey.pem private/03.pem (←探したファイル名を入れる)
# rm newcert.pem
# openssl x509 -in newcerts/03.pem -out www.crt
# openssl rsa -in private/03.pem -out www.key
Enter pass phrase for private/03.pem:パスフレーズを入力
これで、www.example.jp の SSL サーバ証明書ができました。
| mod_ssl ディレクティブ | ファイル |
|---|---|
| SSLCertificateFile | www.crt |
| SSLCertificateKeyFile | www.key |
このまま https://www.example.jp/ へアクセスしても、証明書エラーになってしまいます。
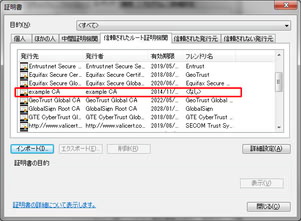
今回構築したルート CA を信頼すると、その CA が署名した www.example.jp も正しい証明書と認識するようになります。
Internet Explorer へ登録する方法を紹介します。Mozilla Firefox 等の場合は、それぞれのソフトウェア内で証明書を登録してください。

信頼されたルート証明機関
これでめでたく、https://www.example.jp/ を警告なしに表示することができます。
オレオレ認証局が力を発揮するのは、HTTPS だけではありません。私のところでは下記の用途で使っています。
SSL あるところ、ほとんどのところで活躍できます。